
Tile · Installation planning
Large-Format Tile in Small Rooms: Scale, Layout, Cuts, and Flatness
Broad tile can reduce the number of visible joints and create a calmer field, even in a compact room. It can also expose uneven walls, produce difficult edge pieces, and demand more from the prepared surface. Measure the result before assuming bigger is better.
The short answer
Large-format tile can make a small room feel less visually busy because there are fewer grout lines, but it does not automatically make the room look larger. The effect depends on tile color and pattern, room shape, lighting, joint contrast, and—most importantly—whether the layout produces balanced pieces instead of narrow slivers. Larger tile also needs a sufficiently flat prepared surface, suitable mortar coverage, careful handling, and control of lippage, which means one tile edge sitting noticeably higher than the next.
What matters most
- Count full pieces and edge cuts on a measured plan; room square footage alone does not show whether the tile size fits well.
- Flat means an even plane; level means horizontal. A sloped wet floor may need to be flat within its planned slope, not level.
- Leveling clips can help hold neighboring edges during cure, but they cannot flatten a bad base or straighten a significantly bent tile.
- Large tile does not eliminate grout joints, movement joints, waterproofing, surface preparation, or the need for correct mortar coverage.
Begin with the actual piece
Large-format is a planning category, not a promise
The term large-format is used for tiles with at least one comparatively long side, but the practical issue is how a specific piece behaves in a specific room. A 12-by-24-inch tile may feel broad in a small entry. A much larger panel creates different handling, cutting, mortar, and support demands. Ask about the exact nominal size, actual measured size, thickness, weight, edge, warpage limits, and approved uses.
Printed pattern scale matters too. A large tile with quiet concrete shading reads differently from a large tile with one bold marble vein. Open several cartons and view enough pieces to see the pattern repeat and variation range. Plan where prominent markings will land instead of discovering a repeated face or abrupt vein at the most visible point.
Fewer joints is not no joints
Large tile still needs correctly sized grout joints and flexible movement joints. Tile edges should not be set tight together, and movement locations should not be filled rigidly to create an uninterrupted look.
Test the cuts in both directions
Measure the usable floor or wall and mark fixed objects, doors, windows, drains, niches, cabinets, toilets, tubs, and transitions. Use the tile's actual size plus the planned grout joint—not the rounded size printed in a product name. Shift the layout to balance the most visible edge pieces, protect focal lines, and avoid tiny cuts where possible.
A centered layout is not always the best layout. Centering on the room may leave a thin piece at a tub; centering on a doorway may misalign the tile with a vanity or hall. Identify the primary sightline and the edges people see most. A dry layout or full-size drawing can compare options before mortar is mixed.
| Condition | What can go wrong | Plan before ordering |
|---|---|---|
| Narrow room | One broad tile leaves thin strips at both walls | Compare orientation and shifted starting points using actual tile and joint dimensions |
| Many corners or cabinets | Complex L-shaped cuts become fragile or visually awkward | Map every fixed object and discuss cut feasibility and extra material |
| Centered drain or niche | The architectural center conflicts with the tile grid | Coordinate fixture position, tile layout, slope, waterproofing, and cut size |
| Strong marble or wood pattern | Repeated graphics or abrupt direction changes become obvious | Open and blend pieces, review rotation rules, and map focal markings |
Understand flatness and uneven adjacent edges
Lippage is the height difference between neighboring tile edges. Some difference can come from the tile's own shape, allowed manufacturing variation, surface unevenness, setting technique, or a combination. Side lighting, narrow grout joints, sharp rectified edges, and glossy finishes can make it more visible. Large pieces bridge longer distances, so dips and humps in the prepared surface become especially important.
Check and prepare the substrate before setting. A long straightedge can reveal high and low areas, but the acceptable tolerance comes from the tile and installation system. Flattening may involve an approved patch, leveler, grinding method, panel, or other preparation after the surface is assessed. 'Self-leveling' material is not simply poured onto any floor; primer, thickness, containment, mixing, cure, moisture, and structural limits still apply.
Flat
An even plane without unacceptable humps and dips. A floor can be flat while intentionally sloped.
Level
Horizontal. Shower floors and some other surfaces intentionally slope, so making them level would defeat the design.
Lippage
The difference in height between two neighboring tile edges; light and edge style influence how noticeable it looks.
Leveling clips
Installation aids that can help control adjacent edges while mortar cures; they do not repair the base or erase tile shape variation.
Support the tile and plan how it will enter the room
Large pieces need the mortar, trowel method, directional placement, and contact required for the application. The goal is suitable support without harmful voids, particularly at corners and edges. An installer may key mortar into the prepared surface and apply material to the back of the tile when the system calls for it. Periodically lifting a tile during work helps verify contact rather than guessing from the exposed joint.
Handling is part of the scope. A piece must fit through doors, turn in halls, be cut with appropriate equipment, and be lowered accurately without disturbing the mortar. Very large tile or panels may require multiple installers, lifting frames, specialized cutters, more workspace, and a different labor plan. Tight bathrooms can be more difficult even though their square footage is low.
Treat a small wet room as an assembly, not a visual trick
A large tile can work on many bathroom walls and some main bathroom floors when approved, but a shower floor has slope and drainage that can limit piece size or require carefully planned cuts. The exact tile must be approved for that shower-floor use. Do not assume a broad tile can bend over multiple slopes or that fewer grout joints create a more waterproof shower.
Waterproofing is a separate layer or system behind the visible finish, integrated at corners, penetrations, the base, curb if present, and drain. Tile and grout do not make the assembly waterproof. Coordinate tile size with the drain and slope design before the base is built, not after the tile arrives.
A compact entry can still support a broad format
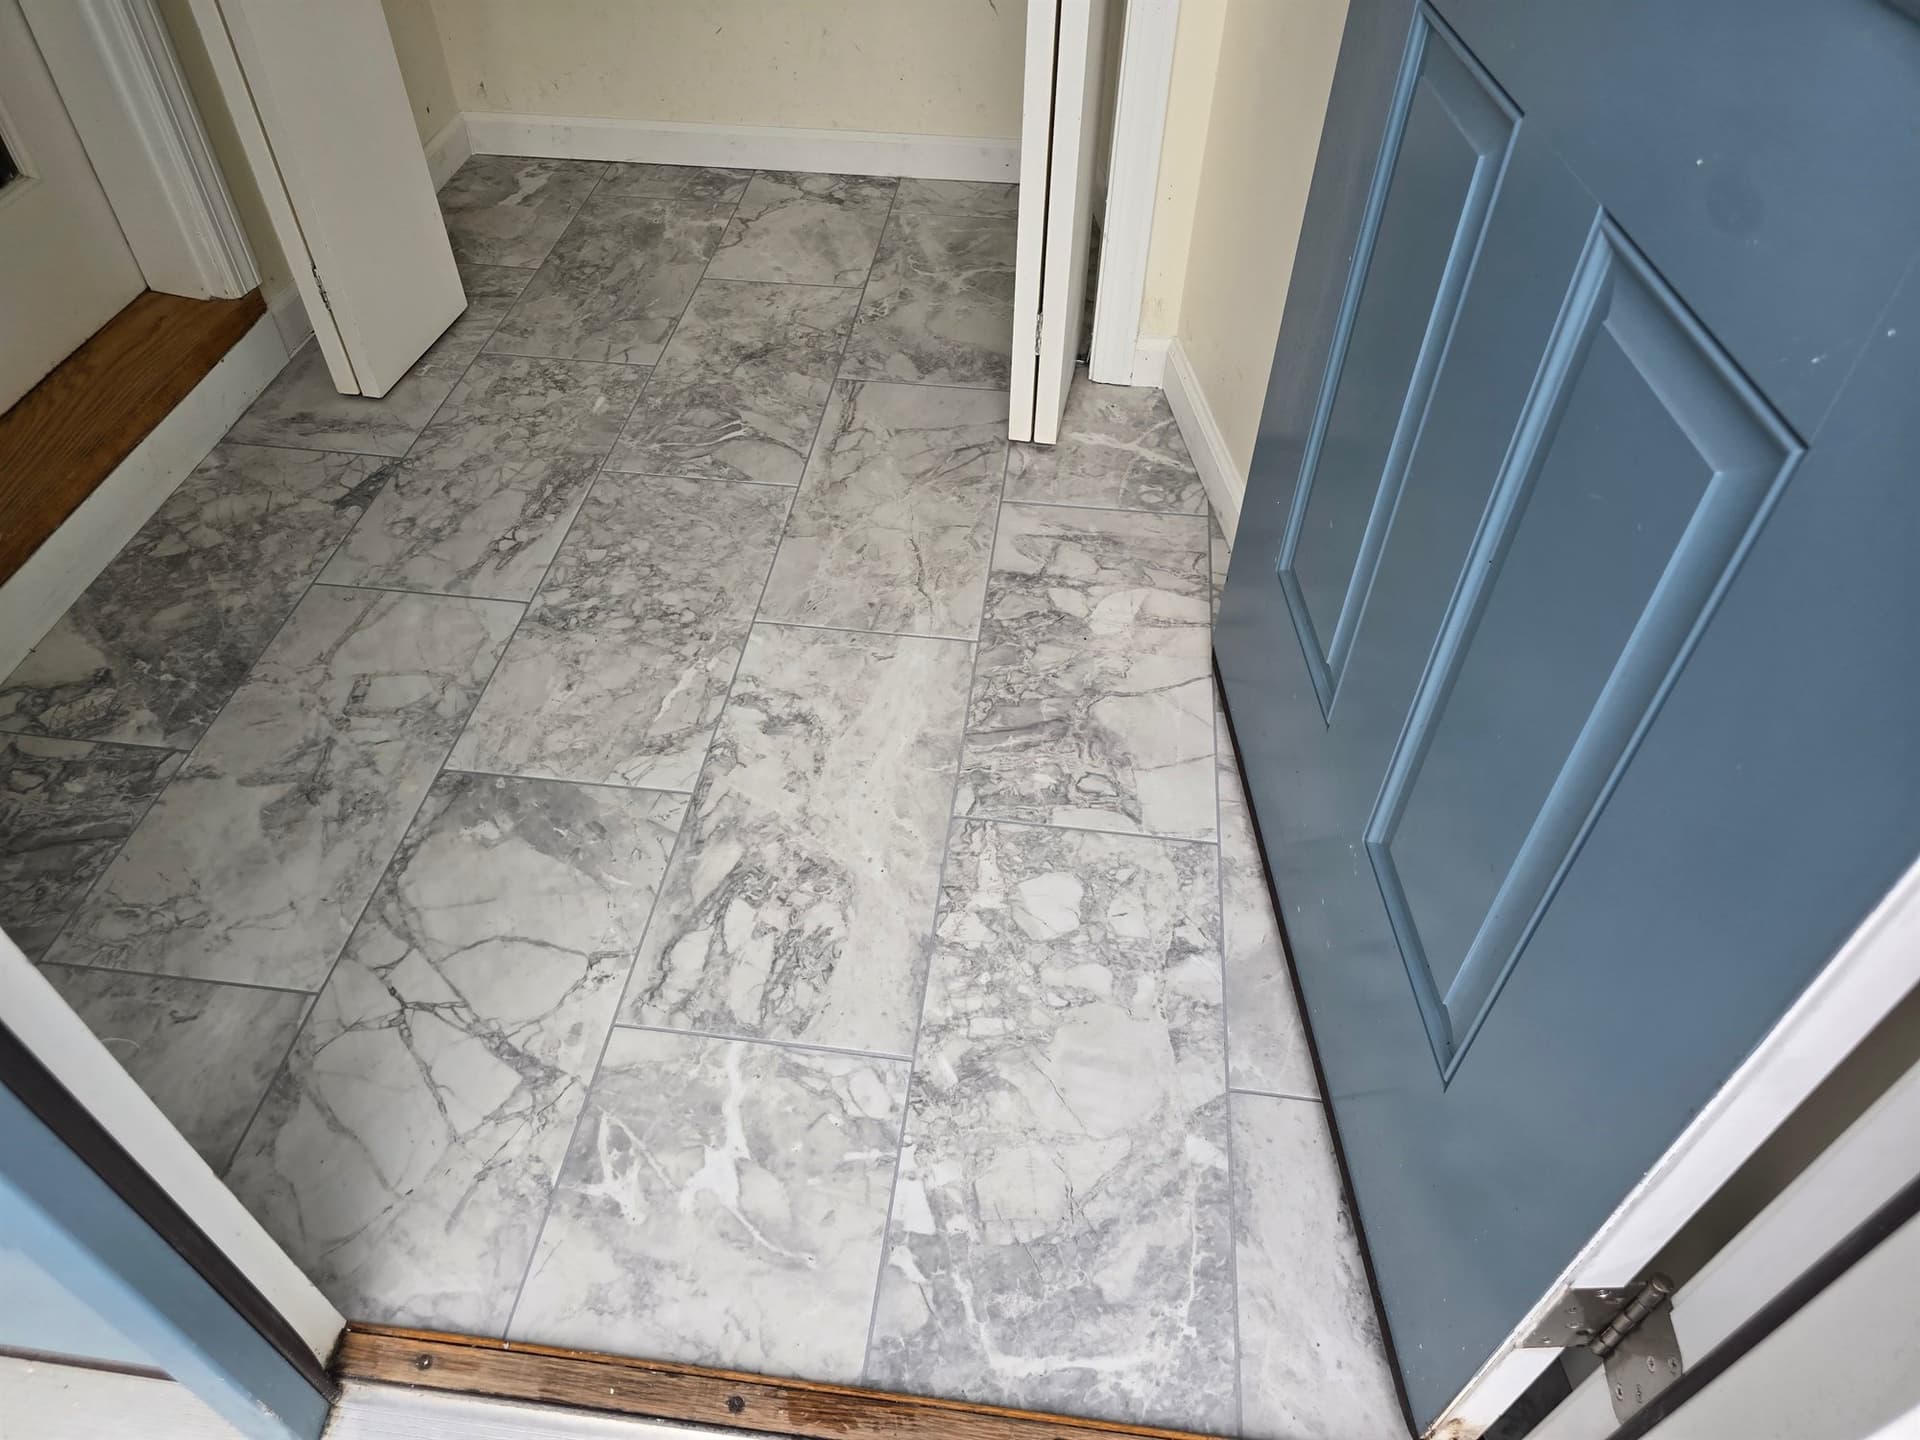
A Floors Now project in West Hartford used 12-by-24-inch glazed porcelain tile in a 46-square-foot residential entry after the old tile was removed from concrete. The completed image shows that a relatively broad rectangle can read calmly in a compact area when the direction and visible cuts are controlled.
The project also shows why tile size is not the whole story. Fifty-three square feet of material was supplied for field pieces, cuts, and waste. The two-day scope included removal, the concrete base, rapid-setting mortar, grout, and baseboard work. Another room with the same square footage but more corners, a different base, or a centered floor drain could require a different format and plan.
Plain-language answers
Common questions
What size tile makes a small bathroom look bigger?
No size guarantees that effect. Larger pieces can reduce the number of joints, while color, pattern scale, grout contrast, lighting, orientation, and balanced cuts also shape how spacious the room feels.
Can large tile go on a shower floor?
Sometimes, but only when the exact tile is approved and the drain and slope design can support it. Traditional center drains with multiple slopes often work more naturally with smaller pieces unless broad tile is carefully cut.
Do leveling clips eliminate lippage?
No. They can help control neighboring edges during installation, but they cannot correct an uneven prepared surface, unsuitable layout, poor mortar coverage, or tile that exceeds allowable shape variation.
Does rectified tile need grout lines?
Yes. Precisely cut edges can support narrower planned joints when the product and system allow, but tiles should not be installed edge-to-edge. Grout and movement joints still have required roles.
Will large tile cost less because there are fewer pieces?
Not necessarily. Preparation, handling, cutting, breakage, equipment, mortar, layout, and labor may increase even though the piece count falls. Price the complete scope for the exact room and tile.
Checked, not guessed
Sources and technical review
Reviewed on September 11, 2026 by Floors Now! flooring team, Connecticut flooring sales and installation team. The sources below support the general guidance. The instructions, room approvals, cleaner list, installation guide, and warranty for the exact product you buy always take priority.
- MAPEI: Tile leveling and lippage systems
Technical explanation of preparation, large-format tile flatness requirements, lippage, and the limits of clip-and-wedge systems.
- Tile Council of North America: Ceramic tile frequently asked questions
Industry guidance on tile selection, grout joints, layout, mortar coverage, surface flatness, movement joints, and other installation fundamentals.
- Tile Council of North America: Dynamic coefficient of friction frequently asked questions
Explains tile-use classifications, how wet-test results are used, and why one laboratory number cannot predict whether a person will slip in every real condition.
- Schluter Systems: Waterproof shower systems
System-manufacturer guidance showing that visible tile and grout are not the shower's waterproofing layer; the approved assembly behind them manages water.
Keep planning
Subfloor preparation
Learn how scraping, patching, flattening, and repairs prepare the base for the selected tile tolerance.
serviceTile installation
Plan format, layout, setting materials, grout, movement details, edges, and cure time together.
projectTwelve-by-twenty-four-inch tile in a real entry
See a broad-format porcelain tile used in a documented 46-square-foot West Hartford entry replacement.
articlePlan tile patterns and shapes
Coordinate scale, centering, edges, joints, focal points, and approved applications.
productTile buyer's guide
Compare tile material, format, finish, room fit, care, and complete installation questions.