Complete Luxury Vinyl buyer's guide

Luxury Vinyl Flooring Explained: A Complete Guide to LVP & LVT.

Luxury Vinyl Plank and Luxury Vinyl Tile belong in one family, but their shape does not tell you how they are made, installed, or where the maker allows them to be used. Learn the common names, see what is inside, and compare actual products with confidence.

  • Planks + tiles
  • Flexible + stiff-center floors
  • Click-together + glued-down
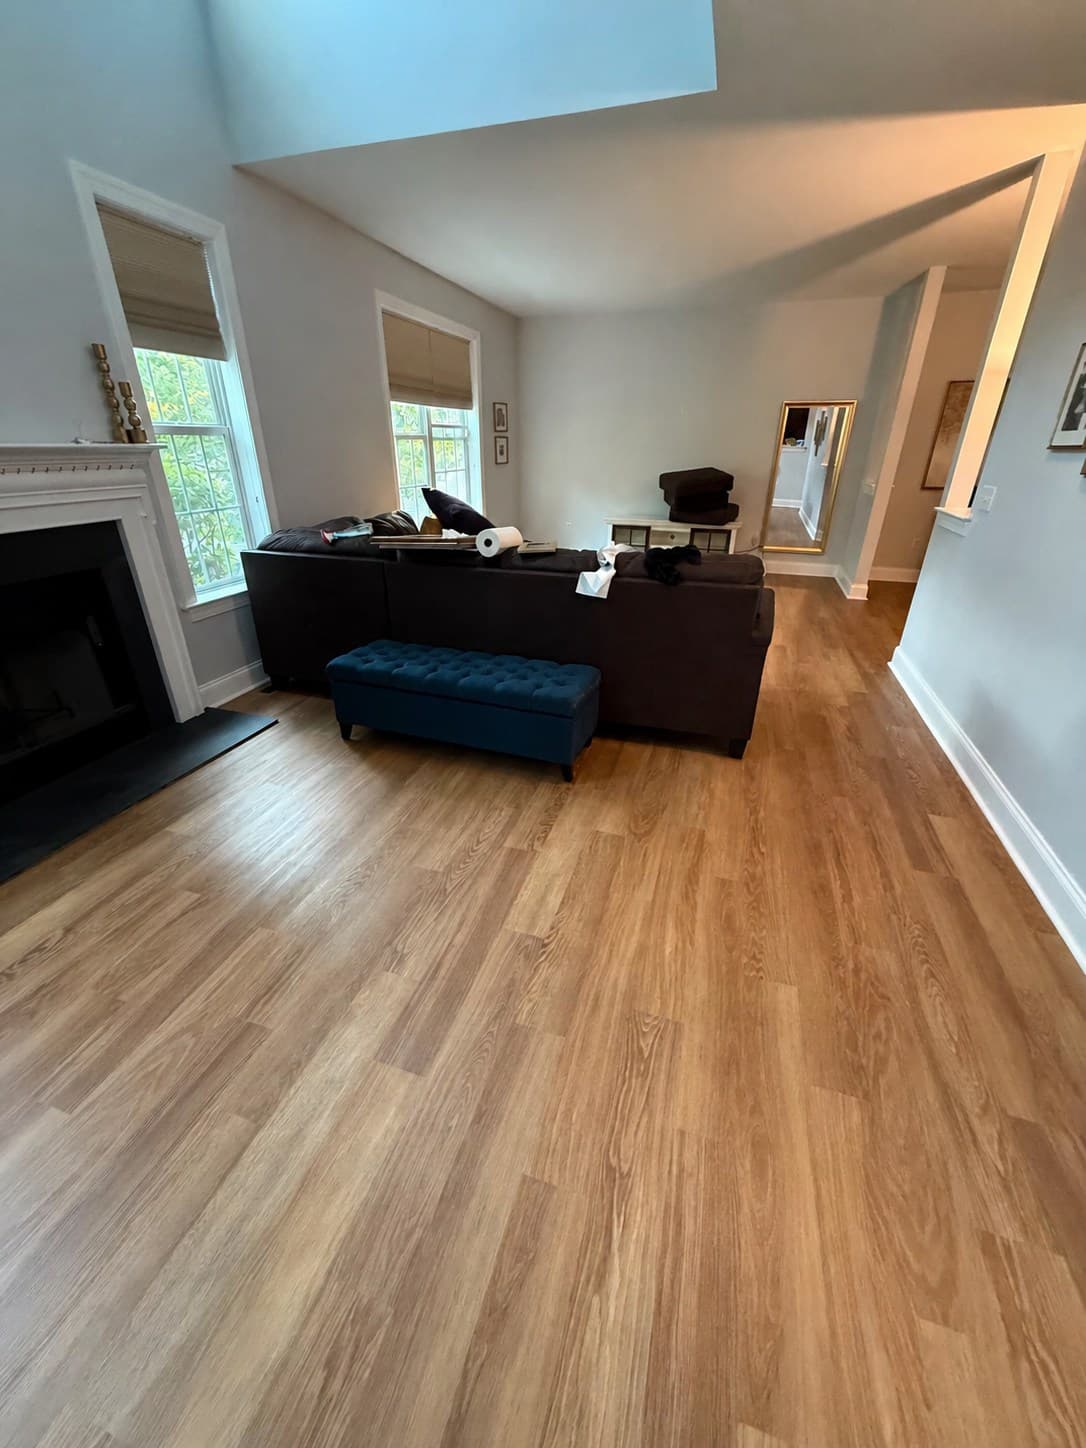
Karndean Honey Limed Oak luxury vinyl flooring installed across a Windsor living room
Wood-look plank formatCommonly called LVP
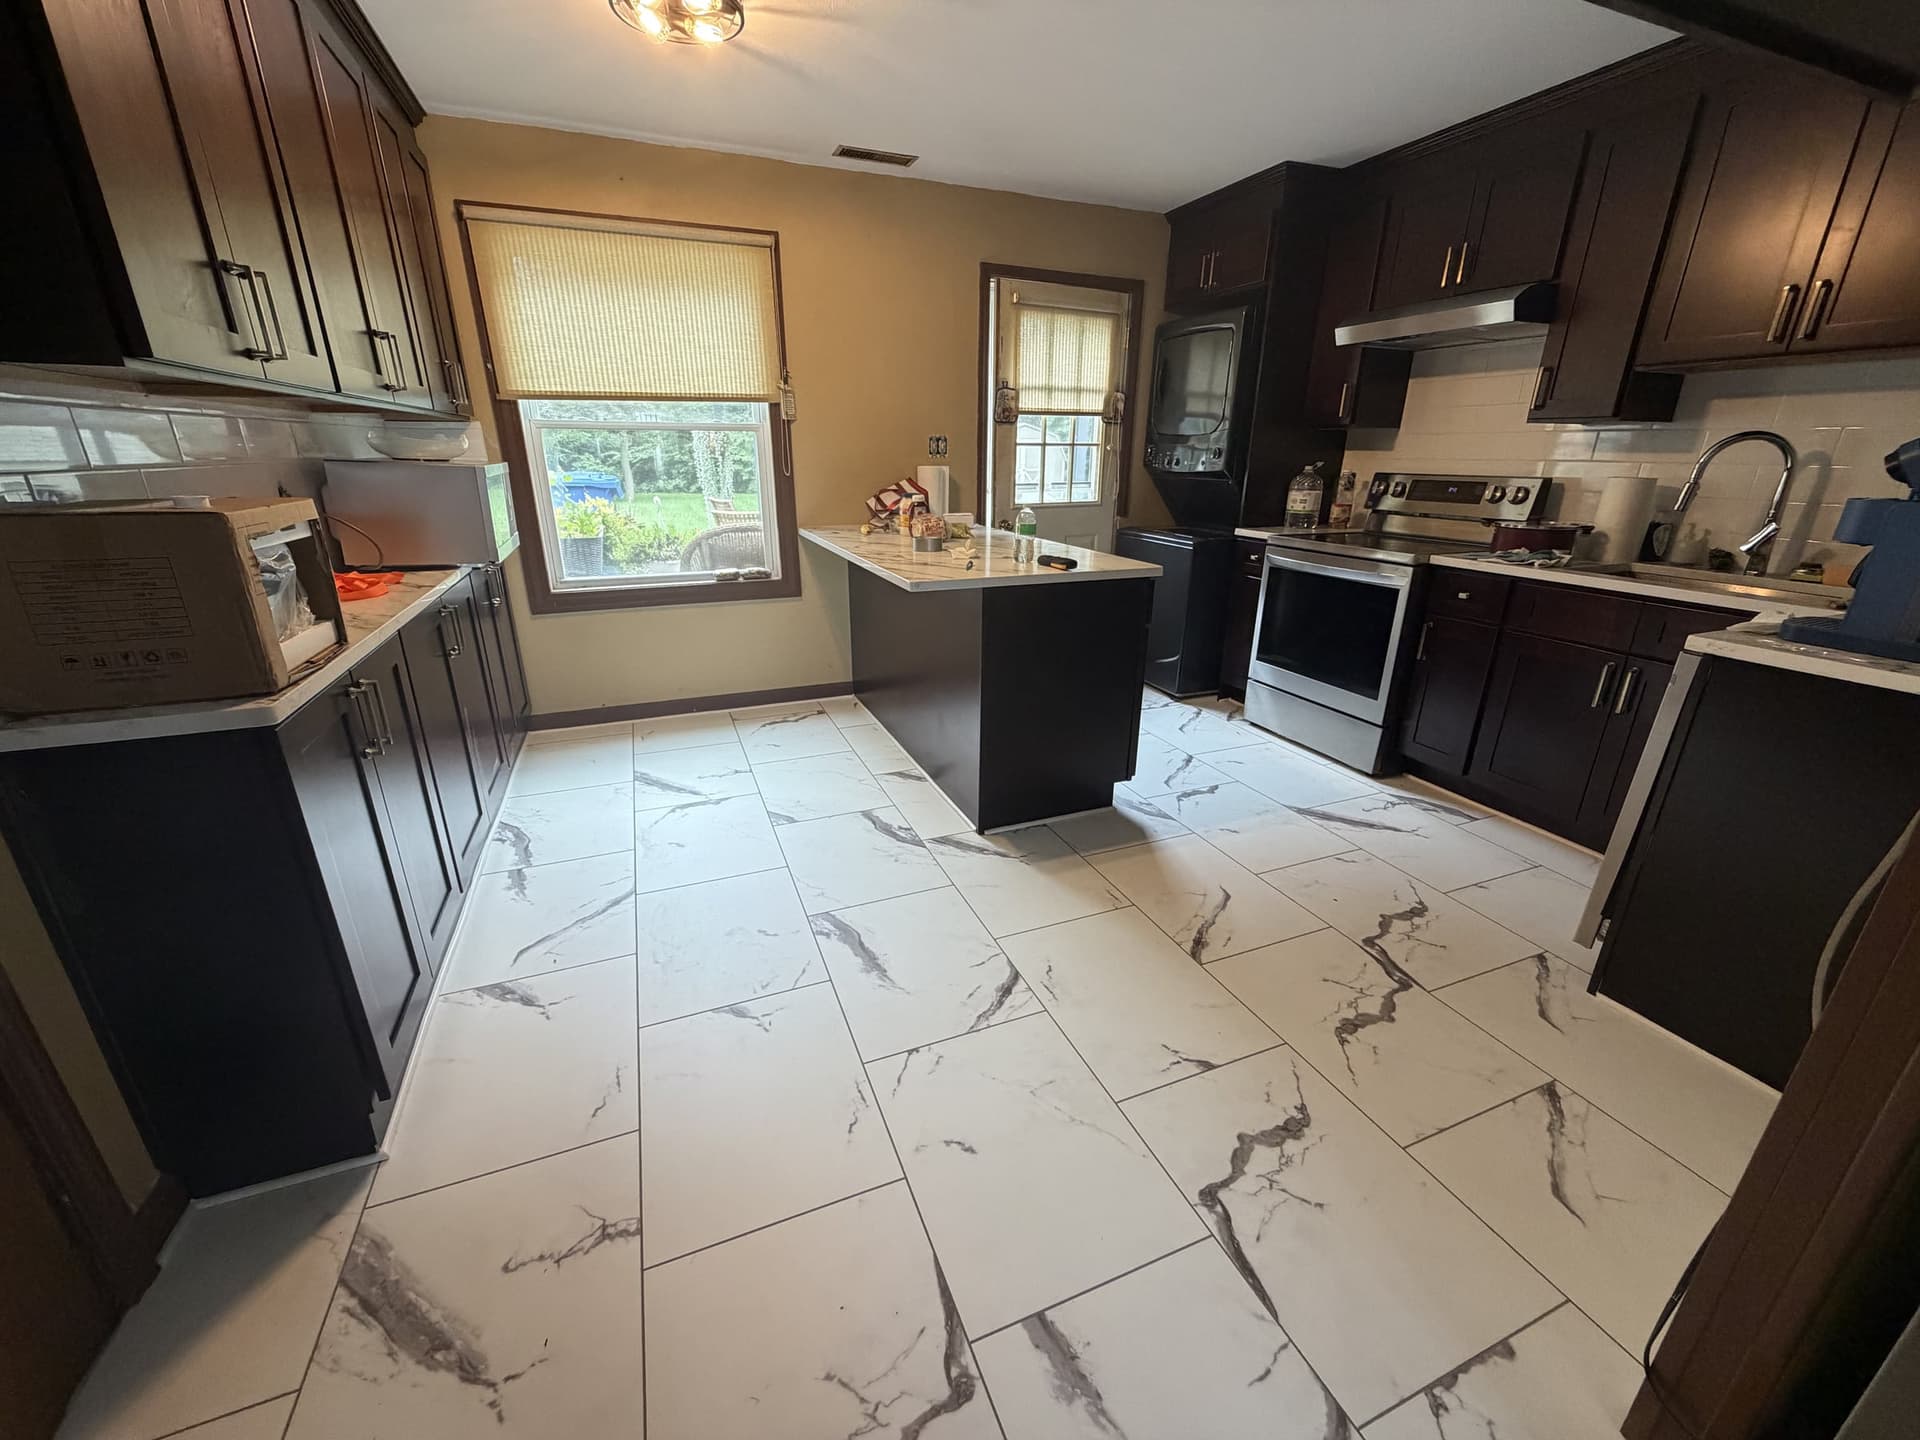
White marble-look Karndean Brunella Marble luxury vinyl tile installed in a Meriden kitchen
Stone-look tile formatCommonly called LVT

The fast answer

Luxury Vinyl is one family—not two unrelated floors.

Luxury vinyl plank (LVP) and luxury vinyl tile (LVT) usually describe the shape of each piece and the look it creates. Either one may be flexible or stiff. It may be a floating floor, where pieces join together without being glued to the floor below, or a glue-down floor, where each piece is attached with flooring glue. Choose the look first, then check how the exact product is built, installed, and allowed to be used.

Often worth exploring when

  • You want a wood, stone, concrete, marble, or decorative look with straightforward routine care.
  • You want a vinyl flooring product that the maker allows for a room where spills or moisture are concerns.
  • You want to compare click-together and glued-down options for different room conditions.
  • You are willing to compare the whole floor—from the surface you see to the layers below it—not just one headline claim.

Pause and compare another option when

  • You want a natural material that changes character with age or may be sanded and refinished later.
  • Sharp objects, heavy furniture legs, wheeled equipment, strong sun, or room temperatures go beyond the product's written limits.
  • A problem with the floor underneath would be covered up instead of found and repaired.
  • You need the flooring alone to make an entire room or shower watertight.

Start with the map

Three decisions that answer three different questions.

LVP and LVT describe plank and tile choices. SPC and WPC are common names for types of stiff center layers. Click means pieces join together; glue-down means each piece is attached to the floor below. Keeping those questions separate makes products much easier to compare.

Shape & appearance

Plank (LVP), tile (LVT), and the look or pattern

Changes the size and shape of each piece, the lines between pieces, and whether the floor looks like wood, stone, concrete, marble, or a decorative pattern.

How it is built

Flexible flooring or flooring with a stiff center, often called a rigid core

Changes the floor's thickness and feel, how easily it may dent, how its edges connect, and where the maker says it can be used.

How it is installed

Pieces that click together, pieces that are glued down, or a product made to lie in place

Changes the work needed below the new floor, the finished height, the gaps needed at room edges, the strips between adjoining floors, and how a future repair may be handled.

Swipe horizontally to compare every column.

What common Luxury Vinyl terms mean
TermWhat it meansWhat it does not tell you
LVP / plankUsually a long plank shape with a wood look.How the product is built, how it will wear, its water limits, or how it is installed.
LVT / tileUsually a tile shape with a stone, ceramic, concrete, marble, or decorative look.That the product is flexible, must be glued down, uses grout, or is allowed inside a shower.
SPC / WPCCommon labels for different types of stiff center layers, often called rigid cores.One recipe shared by every maker or proof that the floor belongs in a certain room.
Click / glue / loose-layWhether pieces join together, are glued down, or are specially made to lie in place with little or no glue.The look, the overall quality, or whether the floor underneath is ready.

See what is under the printed look

See what is inside flexible and click-together Luxury Vinyl.

These close-up views show a common order for the layers. The number of layers and the materials used change from one product to another, so check the maker's written details for the exact floor you are considering.

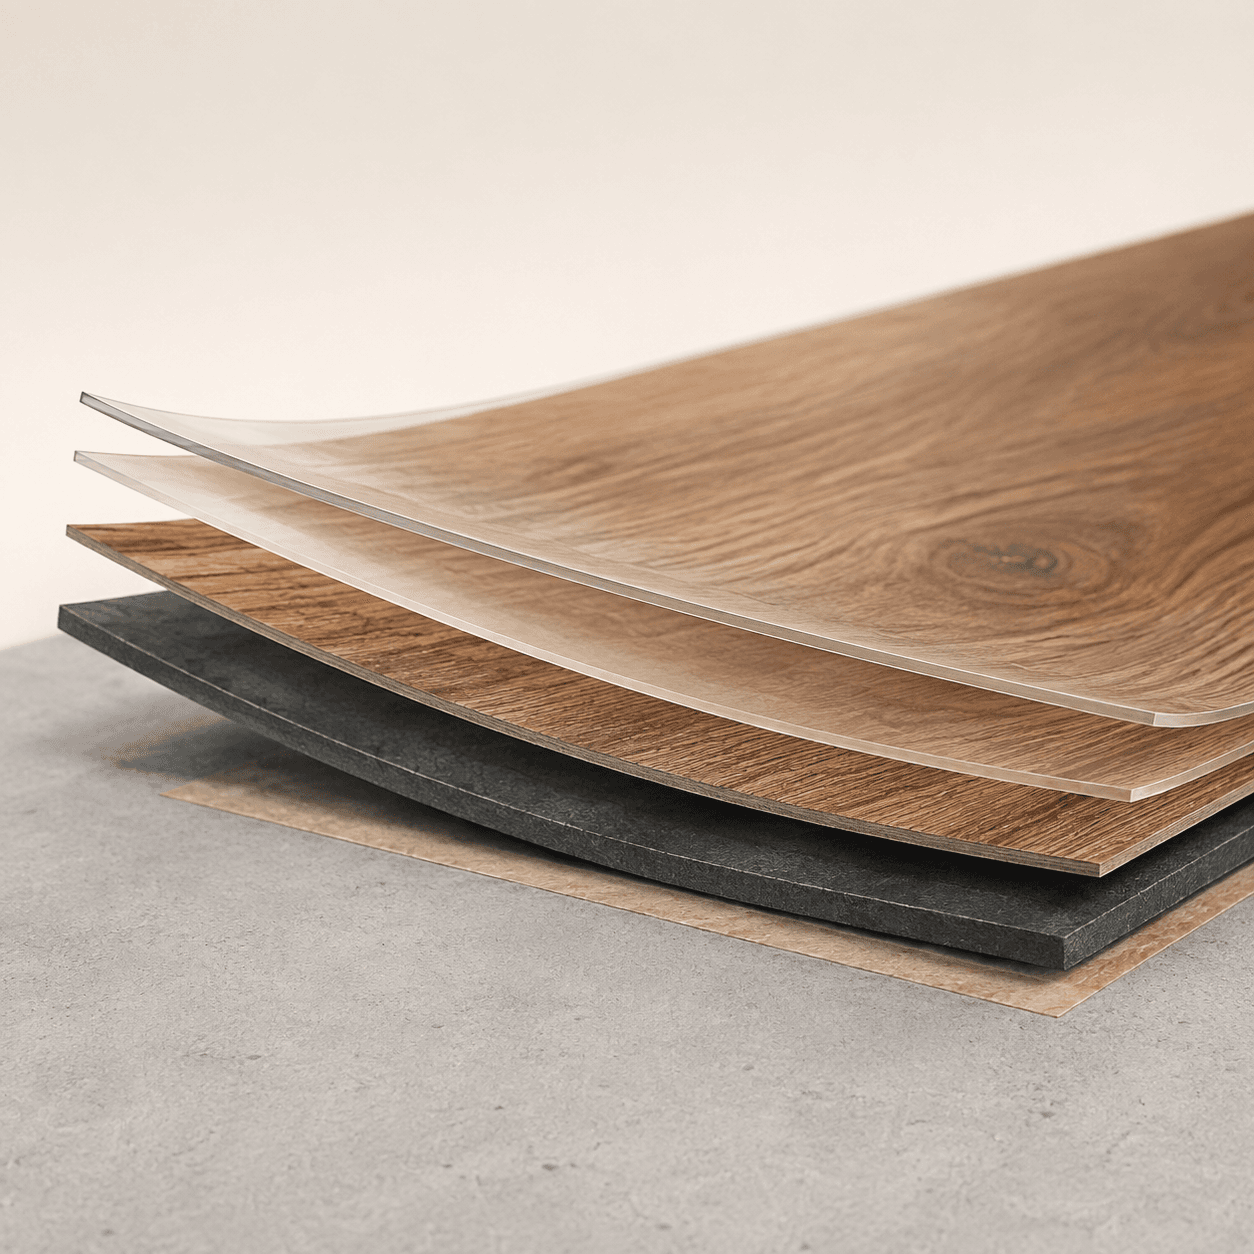
Realistic cutaway of flexible wood-look Luxury Vinyl with enlarged clear layers, a printed layer, a flexible vinyl base, and glue

Thin, flexible Luxury Vinyl

The installer attaches each plank or tile to a clean, dry, flat, and smooth floor using the glue named in the product instructions.

What you are seeing, from top to bottom

  • Surface finish

    The very top coating. It helps protect against stains and scuffs and affects how the floor should be cleaned.

  • Clear wear layer

    A clear layer that protects the printed picture below. Product labels often measure it in mil, meaning thousandths of an inch.

  • Printed picture

    The wood, stone, concrete, marble, or decorative pattern you see.

  • Flexible vinyl base

    The main vinyl part of the piece. It bends more easily and follows the shape of the floor below more closely.

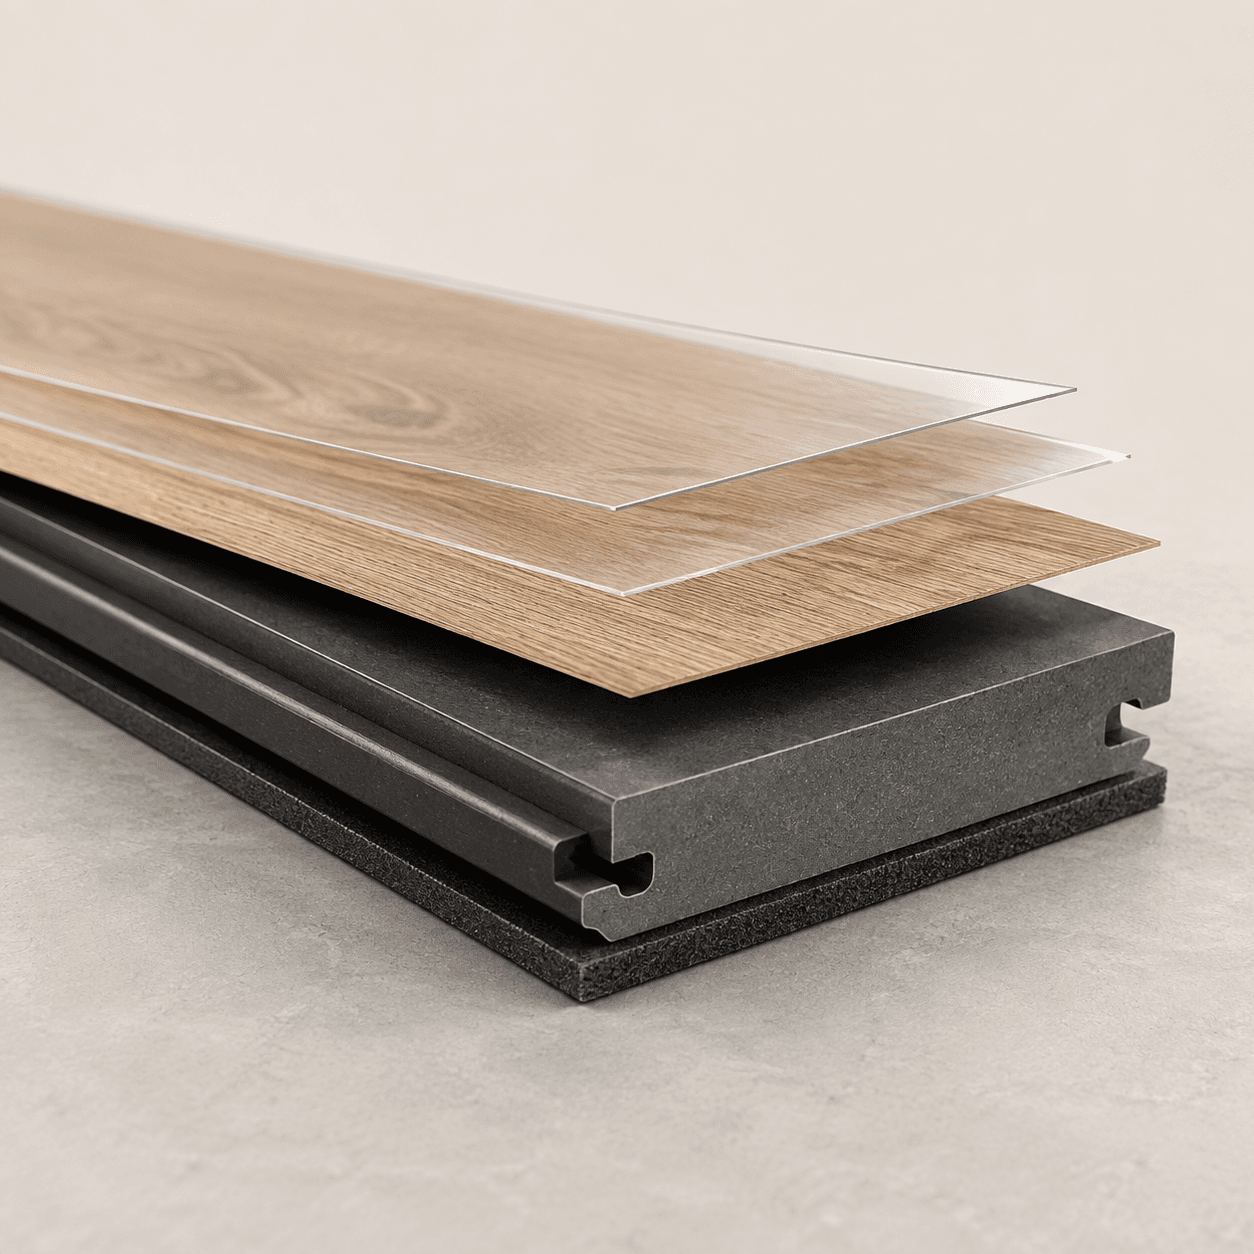
Realistic cutaway of a wood-look Luxury Vinyl plank with enlarged clear layers, a printed layer, a thick stiff center, a bottom pad, and a click-together edge

Thicker Luxury Vinyl with click-together edges

The pieces lock to each other and rest over the floor below instead of being glued down. Installers call this a floating floor.

What you are seeing, from top to bottom

  • Surface finish

    The very top coating. It helps protect against stains and scuffs and affects how the floor should be cleaned.

  • Clear wear layer

    A clear layer that protects the printed picture below. Product labels often measure it in mil, meaning thousandths of an inch.

  • Printed picture

    The wood, stone, concrete, marble, or decorative pattern you see.

  • Stiff center (rigid core)

    The thick, firm part that gives the piece its shape. SPC and WPC are names used for different kinds of this center.

  • Bottom pad, if included

    Some products come with a thin pad already attached. Check the instructions before adding anything else underneath.

The shaped edge lets one piece lock to the next. It is part of the plank, not a separate layer.

Realistic teaching cutaways. Very thin layers are enlarged so they can be seen. They are not to scale, and exact products vary.

How it is made & installed

The shape does not tell you how the floor works.

Plank and tile describe the shape and look. Flexible and rigid core describe whether the product bends or has a stiff center. Installation choices include pieces that click together, pieces glued to the floor below, and specially made loose-lay products that rest in place with little or no glue.

Flexible flooring

Thinner flooring that is often glued down

Flexible luxury vinyl is usually thinner, so it follows the surface below it closely. It can keep the finished floor lower when glued down, but bumps and rough spots below may show through. The floor below must be properly prepared for the flooring glue named by the maker.

Stiff-center flooring (rigid core)

A stiff center, often with click-together edges

Rigid-core products have a stiff center and are often installed as floating floors, meaning the pieces connect without being glued to the floor below. The floor below still must be even enough, and the room must meet the maker's rules for movement, temperature, heavy items, and any padding. A stiff product does not fix an uneven floor.

Click-together (floating)

The pieces join to one another but are not glued to the floor below. Plan the open space needed at room edges, heavy objects that stay in place, long rooms, strips between floors, protection for the clicked edges, sound, and any pad or moisture protection the maker requires or allows below the floor.

Glued down

Each piece attaches to the prepared floor below with the flooring glue named by the maker. This can work well when a lower finished height, wheeled equipment, individual-piece repairs, or business use matters, but the surface below and the glue must work together.

Specially made loose-lay

Some products are specially made to lie flat with little or no glue, or with glue only in places named by the maker. Use this method only when the instructions for that exact product allow it; ordinary LVP or LVT cannot simply be left loose.

Read the product details

The wear layer matters. It does not tell the whole story.

The wear layer is the clear material that protects the printed look. A larger number is easy to market, but whether a floor works in a room also depends on how the whole product is built, how it performed in testing, how it must be installed and cleaned, and what its warranty covers.

Mil and millimeter are different measurements

1 mil

One-thousandth of an inch. In U.S. product information, mil commonly describes the thickness of the clear wear layer that protects the printed look.

1 mm

One millimeter, about 39.37 mil. Millimeters commonly describe total product thickness and sometimes the thickness of one part.

A 6 mm product with a 20 mil wear layer does not have a 20 mm wear layer. The two figures describe different parts of the product. The factory-applied protective finish, sometimes called a topcoat, is also different from the clear wear layer below it.

Ask how the complete product performs

  • Whether it is made for home use, business use, or both
  • Limits for dents, heavy furniture, and wheeled chairs or equipment
  • How much it may move in heat, changing temperatures, or direct sun
  • Information about stains, scratches, scuffs, cleaners, and everyday care
  • Slip, sound, heated-floor, and wet-area test results when they matter
  • Rules for the center, edges, bottom layer, flooring glue, and any pad below it
  • What the warranty leaves out, how the floor must be maintained, and where it may be used

Appearance & everyday use

The look you see and daily wear are different questions.

Start with the look you want, then ask whether the product behind that look fits the room. Two floors that look almost the same can be built differently and have different limits and installation instructions.

Wood-look plank · LVP direction

Look at several boards together

Compare plank width and length, the size of the printed grain, the number and style of knots, surface texture, edge shape, shine level, and the number of different printed boards. View several full planks together so repeated or strongly marked boards are easy to see before installation.

Stone-look tile · LVT direction

Plan the stone-like lines, seams, and tile size

Tile size, the amount and direction of stone-like color or lines—often called veining—edge shape, and any strip or grout look allowed by the maker shape the result. A tile look does not prove that the product is flexible, glued, grouted, or allowed in a wet area.

Patterned floors

Choose a product made for the pattern

Zigzag patterns such as herringbone and chevron, along with borders and other decorative patterns, need pieces and an installation method made for that layout. Confirm whether left and right pieces are needed, where the pattern will sit in the room, its direction, edge cuts, labor, and extra material for cuts instead of assuming any plank will work.

Ask about each kind of damage

Replace the word “durable” with a more useful question.

Wear, scratches & scuffs

The factory finish, the clear wear layer that protects the printed look, the rooms and uses the maker allows, dirt tracked indoors, furniture protection, and cleaning routine all matter. No wear-layer number makes a floor scratch-proof.

Dents & heavy objects

The product's center layer, how firm it is, its bottom layer, support from the floor below, furniture feet, heavy items that stay in one place, and wheeled traffic all matter. Total thickness by itself cannot answer whether a product will dent.

Water & leak exposure

Many products offer useful water resistance, but the promises and time limits vary. Seams, floor edges, walls, fixtures, flooring glue, and the floor below are separate parts of the room and can still be affected.

Sound & comfort

The product's center and bottom layers, any pad the maker allows beneath it, the installation method, the floor below, the room, and footwear all affect feel and sound. In a condo or other building with sound rules, use a test result for the complete floor setup—not for one layer alone.

Sunlight & temperature

Direct sun, heat at a glass door, periods without heating or air conditioning, heated floors, and any required storage or adjustment period before installation can push a product beyond its limits. Compare the written temperature instructions with the actual room.

Repair & replacement

An individual plank or tile may be replaceable, but reaching it is different in a click-together floor than in a glued floor. Confirm the repair method and save labeled spare flooring from the same manufacturing batch.

Start with the room

Check the exact product for the room.

These are starting points, not promises that every Luxury Vinyl product works in the room. The exact product instructions, the room's conditions, and every layer below the new floor determine the final choice.

Swipe horizontally to compare every column.

Rooms where Luxury Vinyl may work and what to check
Room or useStarting pointWhat to check before choosing
KitchenOften a strong candidateWater limits, space below appliances, cabinet and island details, direct sun, strips between adjoining floors, and every layer planned below the product.
Bathroom or laundryMany products may workWhether the exact product is allowed in the room, details around walls and fixtures, what happens after a leak, slip concerns, and whether the floor below needs moisture protection.
Finished basementCommonly consideredMoisture in the concrete, dips or humps in the concrete floor, cracks, anything the maker requires to manage moisture from below, temperature, and whether the pieces should be glued down or joined together without glue.
Living room or bedroomBroad product choiceSound, comfort, sunlight, heavy furniture, rolling chairs, repeated printed boards or tiles, and how the floor meets adjoining rooms.
Commercial or rental spaceOnly when made for that useWhether the product is made for business use, expected foot traffic, heavy or wheeled equipment, cleaning plans, glue or edge-connection requirements, and the business-use warranty.
Inside a showerDo not assume it works thereA water-resistant or waterproof flooring claim does not make the entire shower watertight. Use only flooring and surrounding materials that are specifically allowed for use inside a shower.

Before you order

The installed floor starts below the floor.

Looking closely at the room and existing floor can change which product works, how it should be installed, what repairs are needed, how it meets adjoining floors, and what the job costs. Answer these questions while products are still being compared.

Flat is not the same as level

A floor can slope but still be smooth and even, or look level while hiding dips and humps. The instructions for the exact product say how much unevenness is allowed.

The surface below must be ready

Thin flooring that is glued down can show bumps or texture underneath. Uneven areas can also put strain on the edges of click-together flooring. Any floor left in place below the new one must be secure and suitable for covering.

Water affects more than the visible floor

The flooring surface, lines between pieces, room edges, floor below, glue, padding, and anything needed to control moisture from below all do different jobs. A waterproof-product claim does not promise that the room or the floor below cannot be damaged.

Floor height affects more than doorway strips

The new flooring, any pad or thin layer beneath it, repair material, and old flooring left in place can affect doors, appliances, cabinets, stairs, wall trim, and adjoining floors.

Click-together floors need room to move

A floating floor—pieces joined to each other but not glued to the floor below—generally needs room to expand and contract. Islands, cabinets, other heavy items that stay in place, wall trim, long areas, and strips between floors must follow the exact instructions.

Older flooring deserves a careful review

Do not sand, scrape, drill, or remove an unidentified older vinyl floor or flooring glue until a qualified person has identified the material and the safe way to handle it.

A separate vinyl flooring option

Luxury Vinyl and sheet vinyl solve different problems.

Sheet vinyl should not be grouped into LVP/LVT, but it deserves a fair comparison—especially in smaller rooms where one carefully planned sheet may reduce or eliminate seams across the main floor area.

Luxury Vinyl planks or tiles

Individual planks or tiles

  • Design: plank or tile shape, edge style, pattern, and optional strips that create a grout-like look.
  • Installation: pieces may click together, be glued down, or be specially made to lie in place with little or no glue.
  • Repair: individual-piece replacement may be possible, but access and method vary.
  • Planning: the direction and pattern, repeated prints, room-edge gaps or flooring glue, and strips between adjoining floors all matter.
  • Water: joints remain between the pieces. The selected product's water claim does not make the room or the floor below watertight.
  • Cost: products span a wide price range. How the product is built, repairs below it, pattern, trim, and labor determine the installed cost.

Sheet vinyl

One piece cut from a roll

  • Design: one broad printed surface without a seam around every plank or tile.
  • Installation: seams, room shape, roll width, pattern placement, and the smoothness of the floor below shape the plan.
  • Repair: a patch may be possible, but matching the printed look can be challenging.
  • Planning: fewer seams can be valuable; sheet handling and preparation require skill.
  • Water: a carefully planned sheet can reduce or eliminate seams across the main floor area, but room edges, cuts, openings around pipes or fixtures, and the floor below still need protection.
  • Cost: it is often worth comparing when budget matters, but product quality, room shape, seams, repairs below the floor, and labor determine the total.

Cost, care & warranty

Compare the full installed cost—not just the box price.

Two products with similar box prices can lead to different totals and long-term care. Include repairs below the new floor, labor, trim, cleaning, access for future repairs, and warranty coverage.

Installed cost

Include removal of the old floor, safety testing when needed, repairs and smoothing below the new floor, moisture protection, any pad or flooring glue, extra material, delivery, pattern work, stairs, appliances, wall trim, strips between floors, and furniture moving.

Routine care

Use cleaning tools, entry mats, and furniture pads allowed by the maker. Remove tracked-in dirt and clean spills quickly. Avoid steam, strong cleaners, rough scrubbing pads, and added polish unless the maker specifically allows them.

Warranty reality

Check where the floor may be used, how long coverage lasts, whether coverage shrinks as the floor ages, whether labor is included, and whether the next homeowner is covered. Also read what is not covered, what proof a claim needs, and the rules for cleaning, moisture, temperature, wheeled items, pets, and installation.

Take this to the sample rack

Compare actual products with one checklist.

Record where every answer came from: the product box, the maker's product details, installation guide, warranty, or a written answer from the maker.

  1. Exact brand, collection, color, and product code
  2. Plank or tile size, edge shape, surface finish and texture, and range of printed looks
  3. Whether the product bends or has a stiff center, plus the maker's description of that center
  4. Total product thickness, clear wear-layer thickness, factory top finish, and any bottom pad
  5. Whether it is made for home or business use and which rooms the maker allows
  6. Whether pieces click together, are glued down, or are specially made to lie in place
  7. Rules for the floor below, allowed unevenness, moisture, padding, flooring glue, and temperature
  8. Rules for sunlight, heated floors, heavy furniture, wheeled items, dents, and pets
  9. Cleaning instructions, repair method, warranty, what is not covered, and proof needed for a claim
  10. Square feet in each box, repeated-print information, manufacturing batch, extra material for cuts, and spare flooring to save

Local proof

See different Luxury Vinyl floors in Connecticut homes.

These Floors Now projects show the exact product, work done to the floor below, installation method, strips between adjoining floors, and other parts of the job so you can see how the choices work together.

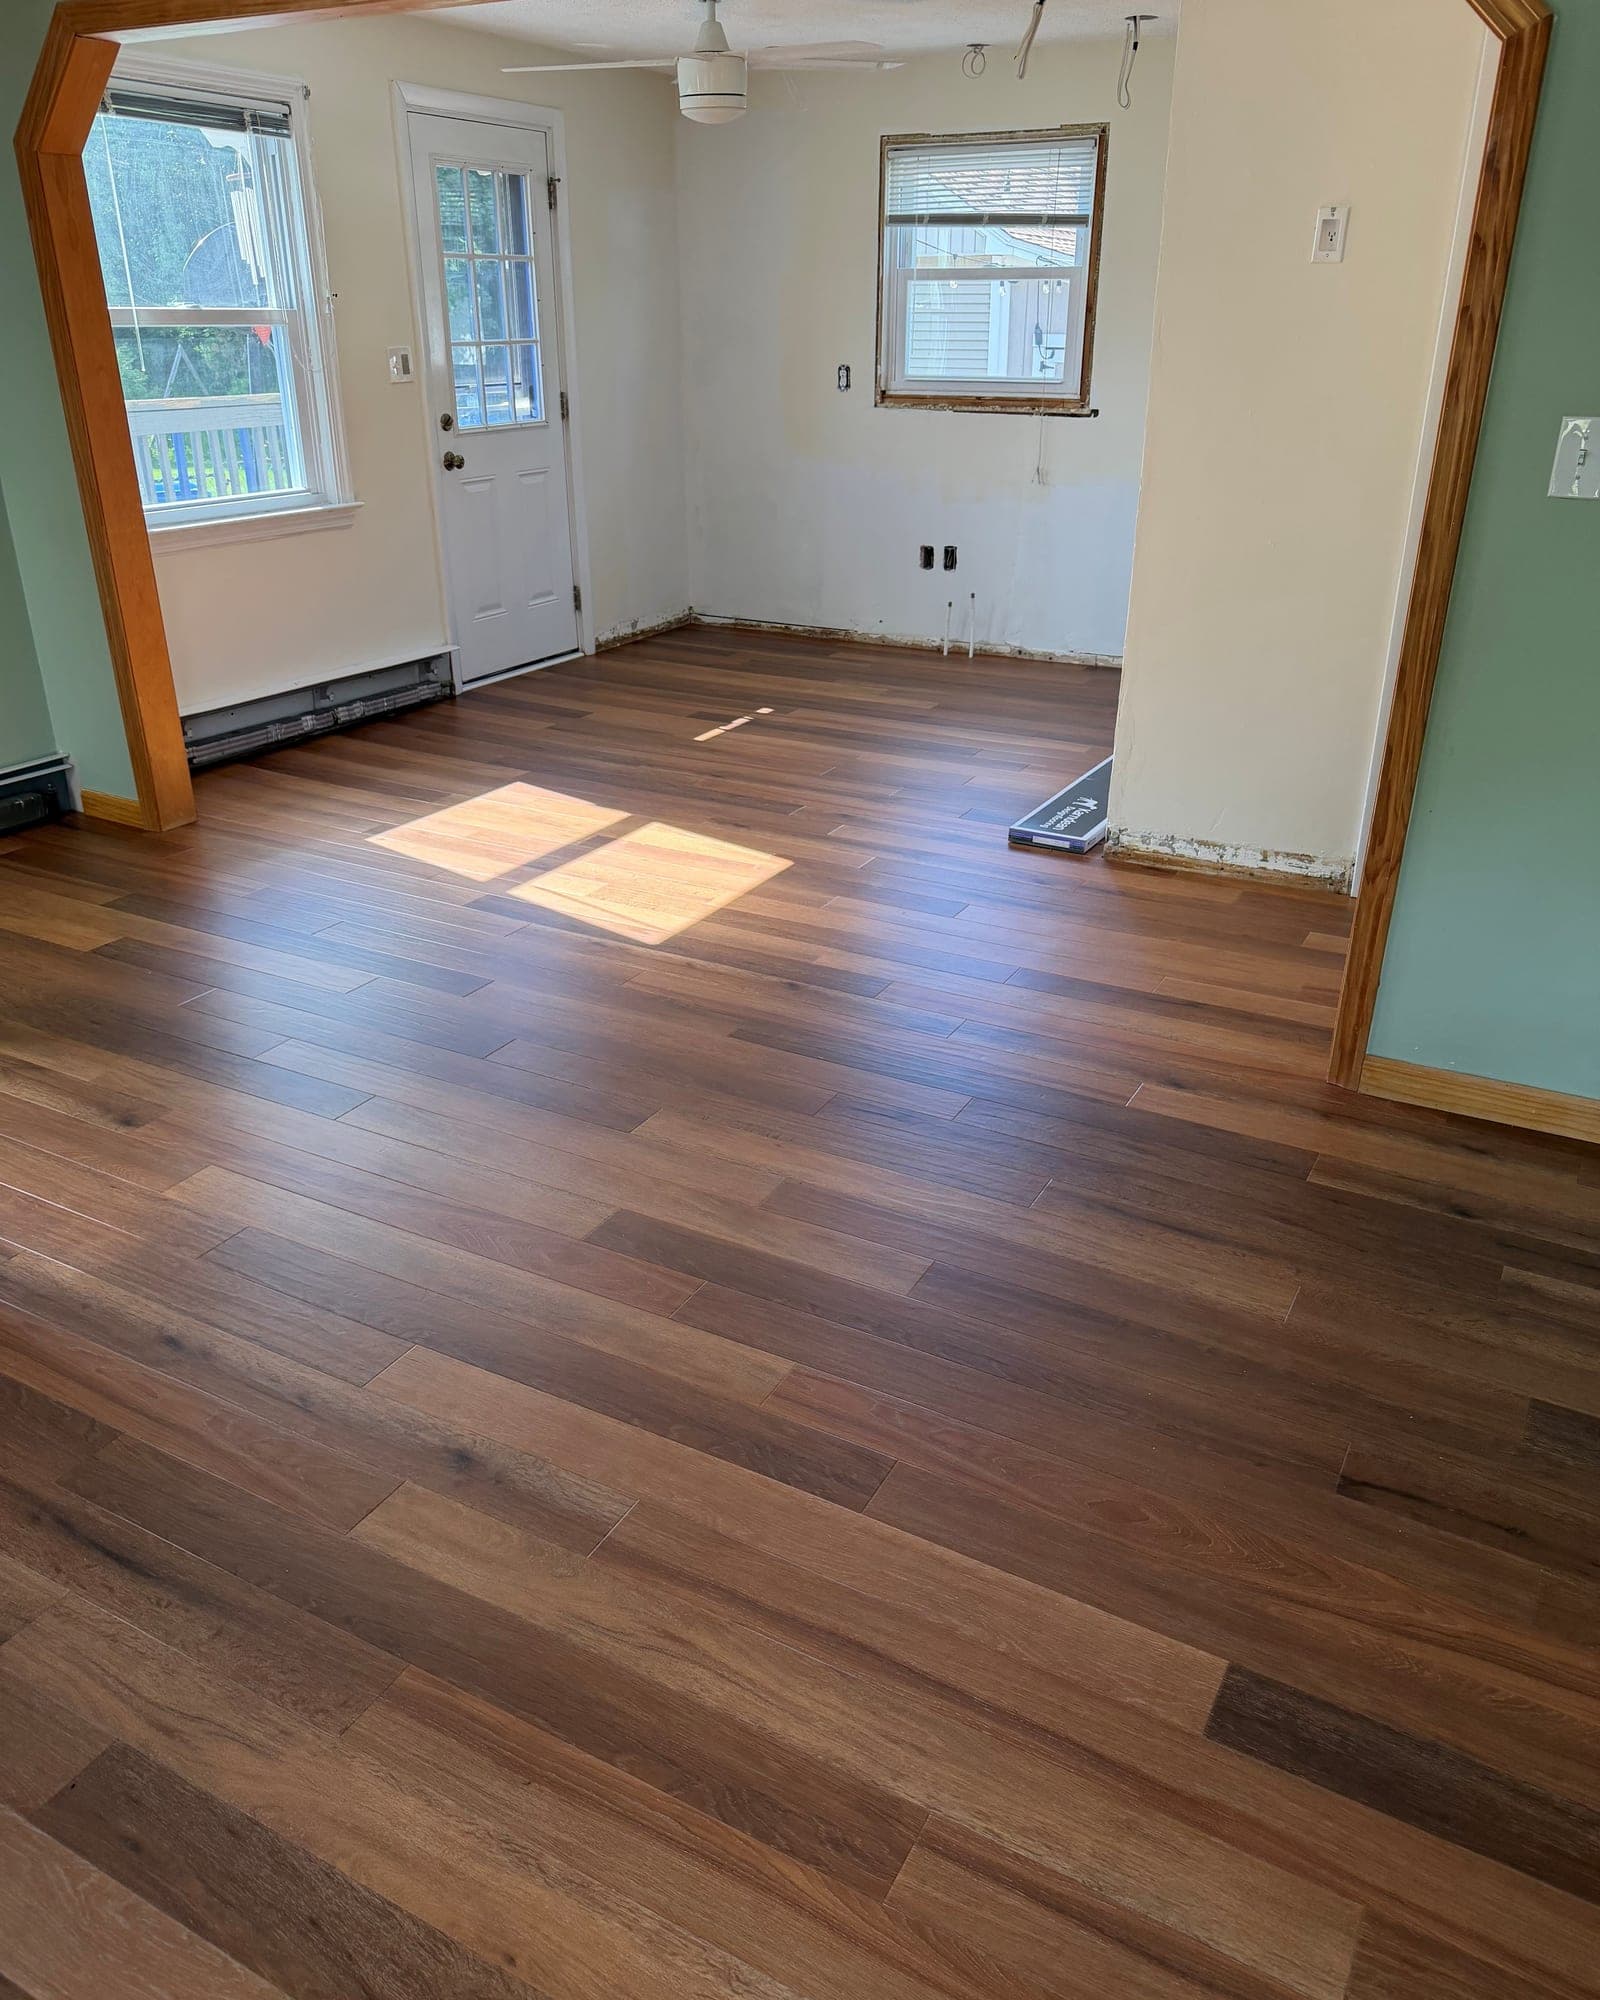
Karndean Honey Limed Oak click luxury vinyl installed through a Windsor living room

Windsor · Click LVP

A click-together plank floor planned with floor repairs, padding, and trim

This multi-room project shows why the visible flooring is only one part of the finished job.

View project details
Marble-look rigid-core luxury vinyl tile installed in a Meriden kitchen

Meriden · LVT with a rigid core

An 18-by-24-inch tile joined together without glue

This is a useful real-world reminder that a tile shape does not automatically mean a flexible or glued-down product.

View project details
Karndean Golden Kent Ash glue-down luxury vinyl connecting a Bristol kitchen and living room

Bristol · LVP glued to the floor below

A wood-look plank glued down after the floor below was repaired

The project shows how securing loose areas, adding a smooth panel layer, and filling uneven spots came before the finished floor.

View project details

Your next step

Bring the room and the sample into the same conversation.

Share room photos, existing-floor details, household needs, and the products you like. We can compare the look, written product details, and installation plan together.

Sources & review

Last reviewed September 7, 2026.

This guide draws on the Resilient Floor Covering Institute's explanations of flexible LVP/LVT and rigid core, along with its overview of sheet vinyl, and the requirements for testing rigid-core flooring in ASTM F3261. For safety information about older floors, see RFCI's Recommended Work Practices resources. Local examples link to Floors Now project records.

This guide helps you compare choices. It does not replace the maker's current product details, installation instructions, warranty, or an in-person look at the room and existing floor.

Flooring Advice

Go deeper on luxury vinyl flooring.

Focused answers for the questions that need more room than a buyer's guide.

Browse all Flooring Advice

Your Luxury Vinyl project

Compare the product and the installation plan together.

Tell us about the room, existing floor, and looks you like. No measurements or perfect plan required.

Step 1 of 4

About 60 seconds

What are you shopping for?
What type of project is it?
Who will handle installation?