
Tile · Color and design
Using Tile to Define Zones in an Open-Concept Home
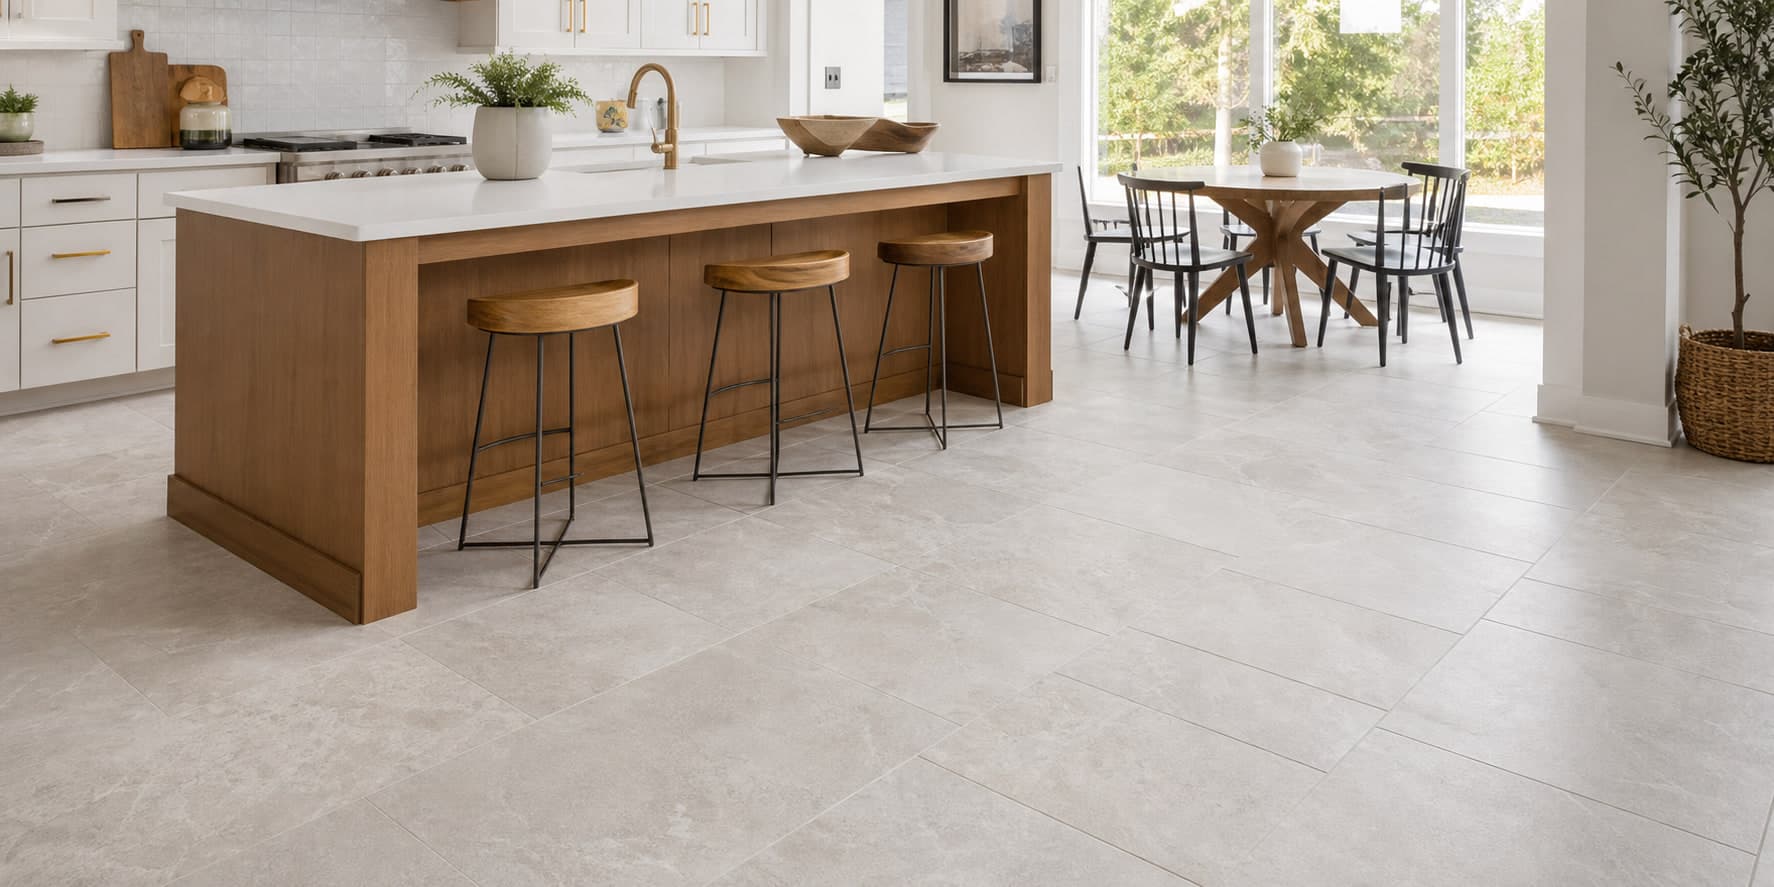
Flooring can give an open room structure without closing it off. Tile can mark a hardworking entry, kitchen, hearth, or dining zone, but the boundary must make visual and construction sense from every direction.
The short answer
Use tile to define an open-plan zone by tying its boundary to something permanent: a wall return, cabinet run, island, doorway, ceiling change, or strong circulation line. Keep the shape simple, plan how tile size and direction meet the boundary, and coordinate the finished height with the neighboring floor. Color and pattern should clarify the zone without making it look like an unrelated patch. The tile, prepared surface, grout, movement details, and transition all need to be designed together.
What matters most
- A boundary looks intentional when it starts and stops at architecture rather than drifting into open floor area.
- Finished height includes preparation, underlayment or membrane, setting material, tile, and neighboring flooring—not tile thickness alone.
- Transitions must address movement, edge protection, cleaning, accessibility, and installation sequence as well as appearance.
- Repeating one color or line across both zones creates continuity even when the flooring materials differ.
Define the purpose
Decide what the tile zone is solving
A zone can be practical, visual, or both. Tile at an exterior entry can create a defined landing for wet shoes and grit. Tile around a kitchen may support the selected use and cleaning routine. A patterned inset can mark a dining area. Before choosing its shape, state what belongs inside the zone and how people will cross it.
A practical zone should extend far enough to perform its job. A tiny patch inside an entry door may end where wet footsteps still land. A kitchen boundary that cuts through stools or a main walking path can feel arbitrary. Sketch furniture, door swings, appliance paths, and circulation before drawing the material line.
Let architecture hold the line
Good stopping points include cabinet ends, wall returns, doorways, posts, stair edges, and changes in ceiling or room width. An unsupported line in the middle of a large space requires especially strong layout logic.
Choose a boundary people can read
Straight boundaries are often the easiest to align, protect, clean, and understand. A curve, stepped line, or patterned edge can work, but it increases custom cuts and makes future replacement more complicated. If the tile itself is visually active, a simple perimeter usually gives it enough structure.
Decide which material should appear to pass through and which should stop. A straight tile edge that aligns with a cabinet run can make the kitchen read as a deliberate block. Running the same tile into an adjacent entry can connect two hard-use zones. Turning plank direction, changing tile orientation, or framing an inset creates stronger separation and should be used only when the room benefits from that emphasis.
| Goal | Possible tile move | Question to resolve |
|---|---|---|
| Protect an entry landing | A simple rectangle tied to the door wall or foyer width | Does the zone cover the likely wet-shoe path and meet neighboring flooring at a stable line? |
| Define a kitchen | End tile at cabinet ends, wall returns, or an island-related axis | Where do stools, appliances, and the main walkway cross the boundary? |
| Mark a dining zone | A framed tile field or controlled pattern change | Will furniture stay centered, and can the field be laid out with balanced edge pieces? |
| Connect hard-use spaces | Repeat tile through entry, mudroom, or kitchen with aligned joints | Do doorways, height changes, and required movement locations interrupt continuity? |
Create contrast without disconnecting the rooms
A material change already creates contrast, so the colors do not always need to be dramatically different. A warm gray tile can pick up a similar undertone in oak. A stone-look tile can repeat the color of a fireplace or counter. Close values create a subtle zone, while strong light-dark contrast makes the boundary more graphic.
Carry one repeated line or finish through the space: align a tile joint with a cabinet, repeat black in a metal transition and lighting, or choose grout that relates to the neighboring floor. View both materials flat on the floor under the actual daylight because upright showroom samples can look lighter and more reflective.
Plan finished height before selecting the transition
Tile height is the complete buildup: the supporting surface, any approved panel or membrane, setting material, and the tile itself. The neighboring floor has its own buildup. Measuring only the sample faces can leave a ridge or an improvised ramp at the boundary. The prepared surfaces may need to be adjusted before either finish is installed.
A transition can protect exposed edges and bridge a small planned difference, but it cannot correct an unstable base or an excessive height surprise. Discuss wheelchairs, walkers, rolling carts, robot vacuums, bare feet, doors, baseboards, and cleaning. The final profile should meet the project's accessibility and installation requirements.
Metal profile
Can create a crisp narrow edge in compatible systems; finish, shape, movement role, and installation timing must be chosen early.
Wood reducer or threshold
Can coordinate with hardwood but adds width and height that should be checked against traffic and doors.
Stone or solid threshold
Can form a strong architectural boundary; confirm support, edge finish, width, and height.
Flush meeting
Looks minimal but requires precise height planning, protected edges, compatible movement details, and correct sequencing.
Coordinate both floors as one project
The tile installer needs to know the actual neighboring product and its installed height. A floating floor—a floor whose pieces connect to each other without being glued or nailed across the whole room—usually needs room to move at fixed boundaries. A nailed, glued, or floating wood-like floor can therefore require a different meeting detail. Do not lock a moving floor under an edge simply to hide a gap unless its instructions approve that assembly.
Tile itself also needs planned movement accommodation. Buildings expand, contract, and shift slightly with temperature, moisture, and load. Flexible movement joints at required locations help the finish handle that normal movement. Their positions should be coordinated with the visual grid rather than filled rigidly or removed from the plan.
Review the zone from the main sightlines
Tape the proposed boundary on the floor and walk the room from the exterior door, kitchen, living area, stairs, and hallway. Place major furniture or templates where they will sit. A line that looked balanced on a plan may divide a walkway, leave a narrow strip beside a cabinet, or appear crooked against a distant wall.
Then lay tile samples with the neighboring floor and intended transition. Confirm pattern direction, joint alignment, edge pieces, color range, surface feel, cleaning, and actual product approvals. Keeping the transition simple and the boundary architecturally anchored usually provides more lasting value than adding a complicated shape simply to call attention to the zone.
Plain-language answers
Common questions
Where should tile stop in an open kitchen?
A wall return, cabinet end, island-related line, doorway, or change in room width is usually easier to read than an unsupported line. Furniture, appliance movement, stools, and walking paths should also be drawn before settling the boundary.
Can tile meet hardwood without a raised strip?
Sometimes, if finished heights, exposed edges, movement needs, and installation sequence are planned precisely. A flush meeting is not automatically suitable for every tile-and-hardwood assembly.
Should the tile and neighboring floor be the same color?
They do not need to match. A shared undertone or repeated detail can connect them, while moderate contrast clarifies the zone. Strong contrast makes every part of the boundary more visible.
Can a transition strip fix a large floor-height difference?
A suitable profile can manage some planned differences, but it should not be treated as a cure for an unplanned or unsafe height change. Measure complete floor buildups and accessibility needs before installation.
Checked, not guessed
Sources and technical review
Reviewed on September 11, 2026 by Floors Now! flooring team, Connecticut flooring sales and installation team. The sources below support the general guidance. The instructions, room approvals, cleaner list, installation guide, and warranty for the exact product you buy always take priority.
- Tile Council of North America: Ceramic tile frequently asked questions
Industry guidance on tile selection, grout joints, layout, mortar coverage, surface flatness, movement joints, and other installation fundamentals.
- MAPEI: Tile leveling and lippage systems
Technical explanation of preparation, large-format tile flatness requirements, lippage, and the limits of clip-and-wedge systems.
- Tile Council of North America: Dynamic coefficient of friction frequently asked questions
Explains tile-use classifications, how wet-test results are used, and why one laboratory number cannot predict whether a person will slip in every real condition.
Keep planning
Tile buyer's guide
Compare tile types, room uses, formats, finishes, grout, preparation, and care.
servicePlan a tile installation
Coordinate surface preparation, layout, grout, movement details, edges, and adjoining floors.
serviceTrim and transitions
Plan finished edges and height changes where tile meets another floor.
articlePlan large-format tile in compact rooms
Understand size, layout, cuts, preparation, and uneven adjacent edges before selecting a broad tile.