Unfinished hardwood buyer's guide

Unfinished Hardwood Flooring: Custom Color, Planned from Bare Wood.

Unfinished hardwood is installed before its final protective finish, then sanded and finished in the home. That creates real design control—but also makes moisture, sampling, sequencing, and return-to-use timing part of the buying decision.

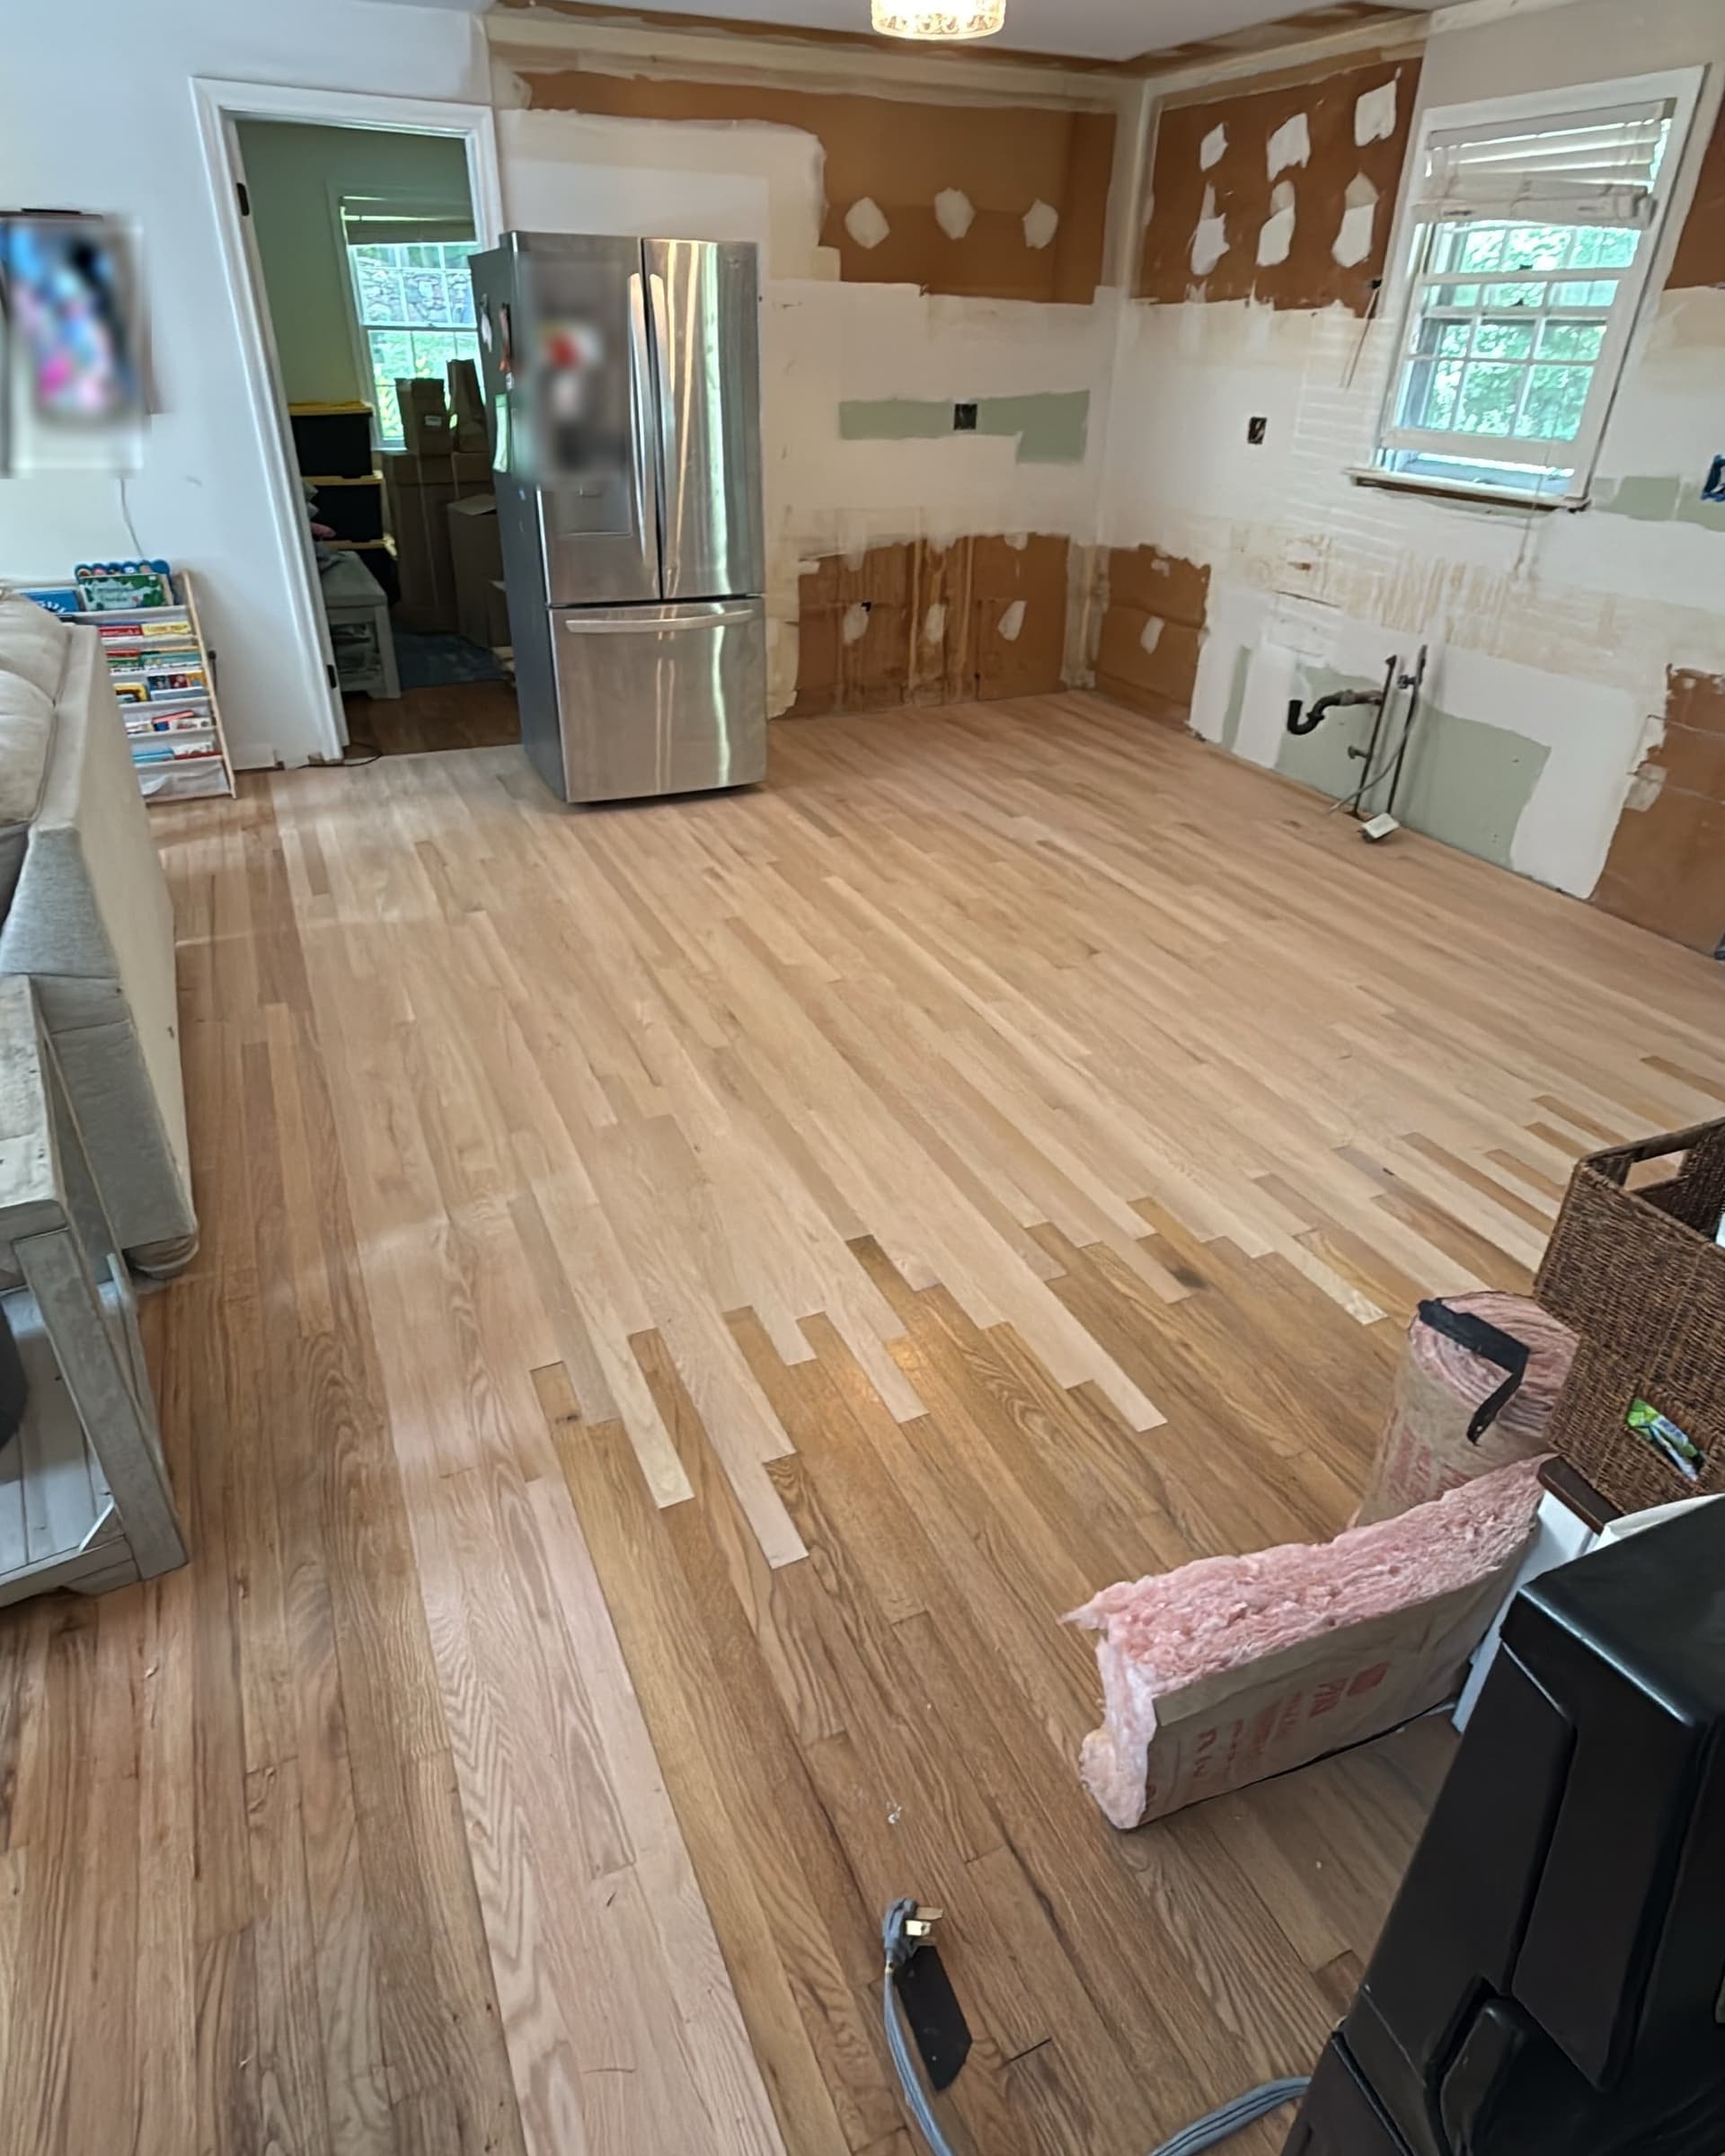
Unfinished red oak boards woven into an existing hardwood floor in Simsbury before sanding and refinishing
Real Simsbury projectNew unfinished red oak woven into intact hardwood. The photograph shows the installation phase before later sanding and finishing.

The fast answer

Unfinished describes when the finish is applied—not how the board is built.

A site-finished floor may be solid or engineered. Choose the construction for the room and conditions, choose the wood for its natural character, and choose the compatible stain, sealer, and protective coats for color, shine, care, and timing. Those three choices should never be collapsed into one sample-board label.

Often worth exploring when

  • You want to approve a custom color and shine level in the room.
  • You prefer the more continuous look of boards sanded together after installation.
  • You are coordinating new wood with an existing floor and want more onsite control.
  • The project schedule can include sanding, finishing, ventilation, and curing time.

Pause and solve these first

  • The building is still damp, open to weather, or undergoing moisture-producing work such as drywall finishing, plastering, concrete work, or painting.
  • Rooms must return to ordinary use immediately after board installation.
  • A moisture problem, weak floor, major unevenness, or height conflict is unresolved.
  • The decision depends on an exact color match or an absolute dust-free promise.

Keep the choices separate

Three decisions shape the same finished floor.

The word unfinished answers only one question: the protective finish has not yet been applied. It does not identify the board construction, the wood's appearance, or the final color.

How the board is made

Solid or engineered hardwood

Solid means one piece of wood. Engineered means a real-wood surface over a layered base. Unfinished products can exist in either construction, so these are separate choices.

How the wood looks

Species, grade, cut, width, length, and layout

These choices shape the floor before stain is considered. Natural color, grain, knots, board movement, and the rhythm of seams all begin with the wood itself.

How it is finished

Natural or stained color, protective coats, and shine level

The approved stain, sealer, and protective coats must work together. Flooring professionals call this group a finish system. A sample made on the actual wood is more useful than choosing from a printed color card.

Unfinished or factory-finished

Compare the whole project—not just the price per square foot.

Neither route is automatically better, cheaper, or more durable. The right comparison includes appearance, scheduling, finish choices, room access, written warranties, and the exact product.

Swipe horizontally to compare every column.

Unfinished hardwood compared with factory-finished hardwood
DecisionUnfinished / finished onsiteFactory-finished
Where finish is appliedAfter boards are installed and sanded together in the homeAt the factory before boards arrive
Color and sheenChosen from a compatible onsite finish system and approved sampleChosen from the maker's finished colors and surfaces
EdgesOften a more continuous square-edge appearance after sandingEdges and bevels are already part of the supplied board
DisruptionIncludes sanding, coating, ventilation, drying, and curing milestonesAvoids onsite sanding and coating of the new boards
Return to useControlled by the exact finish system after installationControlled primarily by installation and product instructions
Warranty structureRaw flooring, finish products, and workmanship may have separate termsFactory finish and flooring commonly follow the product maker's terms

Design the wood first

Stain does not erase the character underneath.

View multiple full boards and a realistic range. Natural wood varies, and the same stain can look different across species, grain, boards, sanding, and room light.

Species
Changes natural color, grain, hardness, and how color is accepted.
Grade
Describes allowed visual character such as knots and color variation; it is not simply a strength ranking.
Saw cut
Changes the grain pattern and can affect how boards respond to changing conditions.
Width and length
Change the floor's rhythm, number of seams, waste plan, and prominence of natural variation.
Layout
Board direction, borders, weaving, vents, and transitions determine how the main floor area meets the room.
Sheen
Changes reflected light and how easily everyday marks are noticed; lower shine often hides small wear better.

Before the first board

Readiness is measured, not guessed from a calendar.

Wood responds to its surroundings. A sound plan documents the building conditions, the wood, and the floor below it, then follows the selected product's installation instructions.

The building

The space should be enclosed; drywall compound, plaster, concrete, paint, and other moisture-producing work should be dry; and permanent heating or cooling should be operating near expected living conditions.

The wood and room

Indoor conditions and wood moisture should be measured and documented. A fixed acclimation-day rule cannot replace those readings.

The floor below

Confirm moisture, strength, fastening, cleanliness, flatness, and compatibility. A known moisture source must be solved first.

Height and movement

Plan doors, appliances, stairs, trim, transitions, expansion details, and adjoining floors before installation.

The finish plan

Name the stain, sealer, coats, sheen, ventilation needs, and written timing before the rooms are committed.

The sample

Approve color on representative project wood using the intended sanding and finish system in the actual room light.

Letting the wood adjust is about measured conditions—not a countdown.

This adjustment period is often called acclimation. The useful question is whether the building, wood, and floor below have reached the conditions required for that product and installation. Leaving unopened wood onsite for an arbitrary number of days does not prove readiness.

From boards to finished floor

The installation and finish schedules are one connected plan.

These steps show the usual decisions in order. The exact product, room conditions, finish maker, and project scope determine which steps apply and how long they take.

  1. Define the wood and room

    Choose the construction, species, grade, cut, size, layout, and intended location before narrowing a finish.

  2. Measure the conditions below and around it

    Check the room, wood, and floor beneath it for moisture, strength, flatness, height, and installation limits.

  3. Deliver and condition the flooring as required

    Readiness is based on measured conditions and the product instructions—not a universal number of days in the house.

  4. Lay out and install the boards

    Board direction, color and grain mixing, fastening or adhesive, borders, transitions, and the starting line are planned together.

  5. Sand and prepare the installed floor

    The sanding sequence creates the surface that receives color and finish. Dust control can reduce spread, but no responsible plan should promise a dust-free job.

  6. Approve a real onsite color sample

    Test the intended sanding and finish system on representative boards in the room's actual light before authorizing the color.

  7. Apply the compatible finish system

    Stain, if selected, is followed by the specified sealer and protective coats with the ventilation and timing each product requires.

  8. Follow separate return-to-use milestones

    Dry-to-touch, walking, furniture, rugs, pets, cleaning, and full cure—when the finish reaches its final hardness—may happen at different times. Use the written schedule for the selected finish.

Matching existing hardwood

More control does not mean a guaranteed invisible match.

Site finishing provides more control than choosing a fixed factory color, but species, grade, cut, age, sunlight, earlier sanding, existing finish, and repairs can all affect the result.

Test the finish on the actual new wood, compare it beside retained boards in more than one light, and decide where any remaining change will look intentional. Board weaving can soften a straight dividing line when the existing floor and project allow it, but feasibility must be evaluated onsite.

Choose species, grade & finish

What changes the match

The wood
Species, grade, grain, board width, and natural color must be compared before stain.
The existing floor
Age, sunlight, prior sanding, repairs, and the old finish can change its appearance.
The sample
Use the actual new wood, planned sanding, stain, and finish—not only a printed color card.
The room
Review samples beside retained boards in the room's daylight and evening light.

A careful sample narrows uncertainty; it does not turn old and new wood into identical material.

Completed by Floors Now · Simsbury, Connecticut

A real unfinished red-oak repair before the finishing phase.

This documented project shows new unfinished material and board weaving honestly. It does not show the later sanding and finishing, and its one-day installation phase is not a promise for another room.

Unfinished Select and Better red oak woven into retained hardwood across a Simsbury kitchen and dining area

What this project documents

New flooring
271 sq. ft. of unfinished 2¼-inch Select & Better solid red oak
Selective removal
101 sq. ft. of flood-damaged hardwood removed while intact adjoining wood remained
Connection
New board ends were staggered and woven into the retained floor instead of ending at one straight seam
Installation
Nail-down removal and installation phase completed in one workday
Photo stage
The connected floor remained unfinished for sanding and refinishing at a later date
See the full project record

Buyer's checklist

Put every important choice in writing.

A complete proposal should make the wood, preparation, finish, schedule, and responsibility for each step understandable before work begins.

  • Solid or engineered construction and approved installation location
  • Species, grade, saw cut, board width, lengths, and layout
  • Room, floor-below, and wood moisture readings—not a guessed waiting period
  • Floor strength, flatness, height, doors, base trim, and transitions
  • A representative onsite sample made on the actual wood
  • Named stain, sealer, protective finish, sheen, and compatibility documents
  • Ventilation, odor sensitivity, room access, and occupancy plan
  • Written walking, furniture, rug, pet, cleaning, and final-hardness (full-cure) milestones
  • Separate material, finish-product, and workmanship warranty details
  • Labeled extra boards saved for possible future repairs

Plain-language answers

Unfinished hardwood questions

What is unfinished hardwood flooring?

It is real wood flooring installed before its final protective surface is applied. After installation, the connected floor is sanded and then finished in the home. “Unfinished” describes when finishing happens; it does not tell you whether the board is solid or engineered.

Is unfinished hardwood always solid wood?

No. Many familiar unfinished floors are solid wood, but unfinished engineered products also exist. Check the exact construction, real-wood surface thickness, approved location, installation method, and future refinishing limits.

Can new unfinished wood match an existing floor exactly?

An invisible match cannot be promised. Species, grade, cut, age, sunlight, earlier sanding, existing finish, repairs, and room lighting can all change the result. Site finishing provides useful control, but the transition and an onsite sample still need approval.

How long before people can walk on it or replace furniture?

There is no safe universal schedule. Walking, furniture, rugs, pets, cleaning, and full cure—when the finish reaches its final hardness—may each have a different wait. Follow the written instructions for the exact stain, sealer, and finish used on the project.

Does site finishing create a smoother-looking floor?

It can create a more continuous square-edge appearance because the boards are sanded after installation. Wood movement and small seasonal changes can still occur, and the final look depends on the product, conditions, installation, sanding, and finish.

Is unfinished hardwood more durable or less expensive?

Not automatically. Durability depends on the wood, use, finish system, number and application of coats, care, and indoor conditions. Total cost includes material, preparation, installation, sanding, finishing, transitions, and the time rooms are out of service.

Does hardwood need a fixed number of acclimation days?

No single day count works for every project. The building should be at expected living conditions, and the wood, room, and floor below should be measured. The selected product and installation instructions determine readiness.

Can unfinished hardwood go in a basement?

Only when the exact construction and installation system are approved for that location and the moisture conditions are within the written limits. Many traditional solid-wood products are not intended below ground level; selected engineered products may allow more options.

How this guide was checked

Primary technical references

These sources explain general industry principles. The instructions and warranties for the exact flooring and finish products still control.

Published and last reviewed September 12, 2026. Reviewed by the Floors Now! flooring team.

Your hardwood project

Ask us to evaluate the wood, room, and finish plan together.

Share the room, existing floor, timing, and look you have in mind. We can help determine whether an unfinished hardwood approach belongs on the shortlist.

Step 1 of 4

About 60 seconds

What are you shopping for?
What type of project is it?
Who will handle installation?